Measuring current with a multimeter might sound like something only electricians or engineers do, but the truth is, anyone can do it how, easy and secure.
Whether you’re trying to figure out why your circuit keeps tripping, why your device isn’t working properly, or just want to understand how much power your electronics are using, knowing how to measure current with a multimeter can be incredibly useful.
Table of Contents
In this article titled “Multimeter How to Measure Current,” we’ll walk you through everything you need to know in simple, easy-to-understand language. No confusing jargon, no complicated math—just clear instructions for complete beginners.
Current, measured in amps (A), is the flow of electricity through a circuit. While voltage tells us the pressure behind that flow, current tells us how much electricity is actually moving.
Measuring current helps determine whether a circuit is drawing too much power, if a battery is being drained faster than it should, or if a component is faulty.
However, unlike measuring voltage—which is relatively straightforward—measuring current requires a bit more setup and care. That’s why it’s important to follow the right steps and take necessary precautions to avoid damaging your multimeter or causing electrical hazards.
In this guide, “Multimeter How to Measure Current,” we’ll explain exactly what current is, how it works, and how to use your multimeter to measure it safely and accurately. You don’t need any prior experience or special tools—just a little patience and a willingness to learn.
We’ll also cover safety tips, common mistakes to avoid, and real-life examples of how to test different circuits and devices. So let’s get started and take the mystery out of measuring current!
What Is Current and Why Measure It?
Before diving into the process of measuring current with a multimeter, it’s important to understand what current actually is and why checking it matters. In the simplest terms, current refers to the flow of electric charge through a circuit. It’s what powers your lights, appliances, and electronic devices.
Without current, electricity wouldn’t move from one point to another, and nothing would work. Current is measured in amperes, often shortened to amps (A), and represents how much electricity is flowing at any given moment. Think of it like water flowing through a pipe—the more water flowing, the higher the current.
Voltage, which many people are familiar with, is the force or pressure behind the current, pushing the electricity through the wires. Resistance, on the other hand, determines how easily the current can flow.
Together, these three factors—voltage, current, and resistance—are related by Ohm’s Law, which states that Current (I) = Voltage (V) / Resistance (R). This means that if you increase the voltage while keeping the resistance the same, the current will also increase.
Similarly, if you increase the resistance, the current will decrease. Understanding this relationship helps make sense of why measuring current is so important.
There are two main types of current: direct current (DC) and alternating current (AC). DC flows in one direction and is typically found in batteries and small electronic devices like smartphones and flashlights.
AC, on the other hand, constantly changes direction and is used in household outlets and most large appliances. Most home multimeters can measure both types of current, though some models may have limitations depending on their design.
For the purposes of this guide, “Multimeter How to Measure Current,” we’ll focus primarily on DC current measurement, as it’s more commonly used in basic electronics and troubleshooting.
Measuring current helps identify issues such as excessive power draw, faulty components, or abnormal circuit behavior. Except current sometimes need to measure voltage , measure diodes or measure coils in a circuit.
For example, if a battery-powered gadget drains its batteries unusually fast, measuring the current can tell you if the device is pulling more power than it should. If an LED light flickers or burns out quickly, checking the current might reveal that it’s receiving too much electricity.
In short, measuring current gives you valuable insight into how your circuits and devices are functioning, making it an essential skill for anyone interested in electronics, repairs, or DIY projects.
Preparing Your Multimeter for Current Measurement
Now that you understand what current is and why it’s important to measure it, it’s time to prepare your multimeter for the task. Unlike measuring voltage or resistance, measuring current requires a slightly different setup, and it’s crucial to do it correctly to avoid damaging your multimeter or the circuit you’re testing.
This section of “Multimeter How to Measure Current” will guide you through the necessary steps to ensure you’re ready to proceed safely and accurately.
First, locate the dial or selection knob on your multimeter. This is usually found near the center of the device and allows you to choose what type of measurement you want to take—in this case, current.
On most digital multimeters, there are separate settings for measuring direct current (DC) and alternating current (AC). Since many everyday electronic devices operate on DC, we’ll focus on DC current measurement first.
The setting for DC current is typically marked with a capital “A” followed by a straight line or dashed line above it (often labeled as A– or A⎓). If you’re measuring current in a household appliance or something connected to a wall outlet, you’ll need to switch to the AC current setting, which is represented by a capital “A” with a wavy line (~) above it (usually labeled as A~).
Next, insert the test leads into the correct ports on your multimeter. This is where measuring current differs significantly from measuring voltage or resistance. When measuring current, the multimeter must be placed in series with the circuit, meaning the electricity has to flow through the multimeter itself.
To do this, you’ll need to break the circuit at a convenient point and insert the multimeter between the two open ends.
Most multimeters have two input jacks for current measurements: one for low current (typically labeled VΩmA) and another for high current (usually labeled 10A). If you expect the current to be less than 200 milliamps (0.2 amps), plug the red probe into the VΩmA port.
However, if you’re unsure about the expected current or suspect it might be higher than 200 mA, always start by plugging the red probe into the 10A port to prevent damage to the multimeter. The black lead should always go into the COM port, which serves as the reference point for all measurements.
If your multimeter does not have an auto-ranging function, you’ll need to manually select the appropriate current range. Ranging refers to the maximum value your multimeter can measure within a given setting.
For example, if you set your multimeter to 200 mA DC, it can accurately measure currents up to 200 milliamps. If you attempt to measure a higher current than the selected range, the display may show an overload symbol (usually “OL”) instead of a reading.
To avoid this, start with a higher range and adjust downward if needed. Once everything is set up correctly, you’re ready to proceed with actually measuring current, which we’ll cover in the next section of this guide, “Multimeter How to Measure Current.”
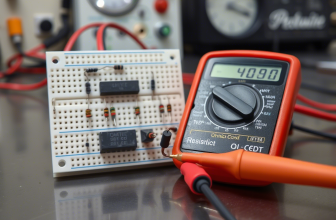
Multimeter offers to measure current properly
Step-by-Step Instructions: How to Measure Current with a Multimeter
Now that your multimeter is properly set up, it’s time to put it into action and measure current in a real-world scenario. This section of “Multimeter How to Measure Current” will walk you through the process in clear, easy-to-follow steps.
Let’s begin with a simple example: measuring the current drawn by a small LED flashlight powered by AA batteries. This is a great exercise because it involves a basic circuit that is safe and easy to handle for beginners.
Start by turning off the flashlight and removing one of the batteries. This step is crucial because, unlike measuring voltage, measuring current requires you to place the multimeter directly into the circuit path.
By removing a battery, you create a gap in the circuit where you can insert the multimeter to measure the flow of electricity. Identify where the positive terminal of the battery connects to the internal wiring of the flashlight—this is where you’ll introduce your multimeter into the circuit.
Take the red probe of your multimeter and connect it to the part of the circuit that was previously connected to the positive side of the removed battery. Then, take the black probe and connect it to the other end of the gap you created.
Essentially, you’re using the multimeter as a temporary replacement for the missing battery connection, allowing current to flow through the multimeter before continuing on its way to the rest of the circuit. Make sure the probes maintain firm contact with the metal parts of the circuit to ensure an accurate reading.
Once the connections are secure, turn on the flashlight. The LED should light up, indicating that the circuit is complete and electricity is flowing. At the same time, the multimeter’s display should show a numerical value representing the amount of current being drawn by the flashlight.
For a typical LED flashlight powered by AA batteries, you should expect a reading in the range of 50 to 150 milliamps (mA), depending on the brightness of the LED and the efficiency of the circuit. If the reading is significantly lower or higher than expected, it could indicate a problem with the flashlight, such as a weak battery, a faulty LED, or poor connections in the circuit.
Let’s try another example: measuring the current drawn by a small motor, such as the one found in a toy car or handheld fan. Begin by disconnecting the motor from its power source, which could be a battery pack or direct connection to a power supply.
Set your multimeter to the appropriate current setting—start with the 10A port if you’re unsure of the expected current draw. Break the circuit at a convenient point and insert the multimeter in series, ensuring the red probe connects to the power source side and the black probe connects to the motor side.
Turn on the motor and observe the reading on the multimeter. Small motors typically draw anywhere from 100 mA to several amps, depending on their size and load.
If the reading is unexpectedly high, it could mean the motor is under strain or malfunctioning, potentially drawing too much current and risking overheating or damage.
As you practice measuring current in different circuits, keep in mind that consistency and proper technique are key to obtaining accurate results.
Ensure that the probes make solid contact with the circuit, avoid touching exposed metal parts with your hands, and always double-check your multimeter settings before taking a measurement.
By following these simple guidelines, you’ll quickly become comfortable with the process described in this section of “Multimeter How to Measure Current.”
Understanding and Interpreting Current Readings
Once you’ve taken a current measurement, the next step is understanding what the numbers on your multimeter mean. In this part of “Multimeter How to Measure Current,” we’ll break down how to interpret the readings you see on the display and what they signify about the circuit or device you’re testing.
While the exact appearance of the display may vary slightly depending on your multimeter model, most digital versions will show a numerical value followed by a unit of measurement—typically milliamps (mA) or amps (A).
Let’s start with DC current readings, which you might encounter when testing small electronic devices like flashlights, toys, or remote controls. Suppose you measured a LED flashlight and saw a reading of 75 mA.
This means the flashlight is drawing 75 milliamps of current from the battery. For most LED-based devices, this is a normal range, especially if the flashlight uses a single AA or AAA battery.
If the reading is significantly lower, such as 30 mA or less, it could indicate a weak battery or a faulty connection somewhere in the circuit. If the reading is much higher—say, over 150 mA—it might suggest that the LED is damaged or that there’s a short circuit causing excessive power draw.
When measuring current in a motor-driven device, such as a toy car or handheld fan, the expected values will be higher. Small hobby motors typically draw anywhere from 100 mA to 1 amp, depending on their size and workload.
If you measure a motor and see a reading of 500 mA, that suggests it’s operating normally under typical conditions. However, if the reading jumps to 1.5A or more, it could indicate that the motor is under strain—perhaps due to a jammed gear or blocked movement—or that it’s failing and drawing more current than usual.
In such cases, it’s worth inspecting the mechanical components to see if anything is obstructing the motor’s motion. Many motors has a capacitor connected and need to measure the capacitor also.
Another thing you might encounter when interpreting current readings is an “OL” symbol on the display. This stands for “Overload” and appears when the current you’re measuring exceeds the selected range on your multimeter.
For instance, if you set your multimeter to 200 mA DC but try to measure a device that draws 500 mA, the display will show “OL” because the current is too high for that setting. To resolve this, simply adjust the multimeter’s dial to a higher current range and try again.
Some modern multimeters have auto-ranging capabilities, which automatically detect and display the correct current without requiring manual adjustments. If your multimeter has this feature, you won’t see an overload warning unless the current exceeds the device’s maximum limit, which is typically around 10 amps for most standard models.
It’s also important to note that minor variations in readings are normal and don’t necessarily indicate a problem. Environmental factors, battery condition, and the quality of your multimeter can all influence the precision of the measurement.
As long as the reading stays within an expected range for the component or circuit you’re testing, there’s generally nothing to worry about.
With this knowledge, you’ll be better equipped to assess whether the current levels you’re measuring are within acceptable limits, allowing you to make informed decisions about your electrical equipment.
Common Mistakes and Safety Tips When Measuring Current
While measuring current with a multimeter is a powerful diagnostic tool, it’s also one of the riskier tasks compared to measuring voltage, measure frequency or measure resistance.
Because current measurement requires inserting the multimeter directly into the circuit path, there’s a higher chance of damaging the device or causing electrical hazards if done incorrectly.
In this section of “Multimeter How to Measure Current,” we’ll highlight some of the most common mistakes beginners make and provide essential safety tips to help you avoid them.
One of the most frequent errors is using the wrong input port when connecting the test leads. Many multimeters have multiple input jacks, including one for voltage and resistance (usually labeled VΩmA) and another for high-current measurements (often labeled 10A).
If you accidentally plug the red lead into the VΩmA port while measuring a high-current circuit, you risk blowing the internal fuse of the multimeter or even damaging the device entirely.
Always remember: if you’re measuring current above 200 mA, use the 10A port. If you’re unsure about the expected current draw, start with the 10A setting and then switch to a lower range if necessary after confirming the current level.
Another common mistake is forgetting to change the multimeter back to voltage mode after measuring current. Leaving the meter in current mode and then attempting to measure voltage can cause a short circuit, potentially damaging both the multimeter and the circuit being tested.
Always double-check your multimeter’s dial position before taking any new measurements, especially if you’ve recently used it for current testing. Developing the habit of switching back to voltage mode immediately after finishing a current measurement can save you from costly mistakes.
Perhaps the most dangerous error is attempting to measure current in a high-power AC circuit without proper protection. Household electrical systems operate at high voltages and currents, making them extremely hazardous if handled improperly.
Unless you have professional training and the appropriate safety gear, never attempt to measure current in live mains circuits (such as wall outlets or appliances plugged directly into the wall).
Doing so can result in severe electric shock, fire hazards, or even fatal accidents. Stick to low-voltage DC circuits, such as those powered by batteries, until you gain more experience and confidence.
Lastly, failing to break the circuit properly before inserting the multimeter can lead to incorrect readings or unnecessary risks. Unlike voltage measurements, which are performed in parallel, current measurements require the multimeter to be placed in series with the circuit.
This means you must physically interrupt the circuit and insert the multimeter between the two ends. Failing to do this correctly can result in incomplete connections, erratic readings, or potential damage to components.
Always ensure the circuit is completely disconnected from its power source before making modifications.
By being mindful of these common pitfalls and following basic safety precautions, you can ensure that every current measurement you perform is both accurate and secure.
Troubleshooting Electrical Issues Using Current Measurements
Now that you know how to measure current and interpret the readings, let’s explore how to use this knowledge for troubleshooting common electrical problems.
In this section of “Multimeter How to Measure Current,” we’ll walk through real-world scenarios where measuring current can help identify issues in everyday circuits and devices.
Whether you’re dealing with a battery-draining gadget, a motor that stalls under load, or a circuit that trips unexpectedly, measuring current can be a powerful diagnostic tool.
Let’s start with a simple example: a portable speaker that runs on rechargeable batteries but doesn’t last as long as it used to. Before assuming the battery is faulty, use your multimeter to check how much current the speaker draws during operation.
Set your multimeter to DC current mode and break the circuit between the battery and the speaker’s internal circuitry. Insert the multimeter in series and turn on the speaker.
If the current draw is significantly higher than expected—for example, if it’s pulling 1.5A when it should only be drawing 500mA—it could indicate a problem with the amplifier or internal components drawing excessive power.
This extra strain on the battery reduces its lifespan and could even cause overheating. Replacing a faulty component or adjusting the circuit may restore normal battery life.
Another common scenario involves a small motor, such as the one found in a handheld fan or toy car. Imagine a toy car that moves sluggishly or struggles to climb inclines. Instead of guessing whether the motor is failing, use your multimeter to measure the current draw.
Set the multimeter to the appropriate range—starting with the 10A setting if you’re unsure—and insert it into the circuit between the battery and the motor. If the current draw spikes when the motor is under load, it could indicate that the motor is worn out or that something is mechanically obstructing its movement.
Excessive current draw can also shorten the life of the battery and increase the risk of overheating, so identifying and resolving the issue early is essential.
Household electronics can also benefit from current checks. Imagine a smart thermostat that frequently resets or behaves erratically. Instead of replacing the entire unit, grab your multimeter and test the current draw from the power supply.
If the reading fluctuates dramatically or consistently exceeds the manufacturer’s specifications, it could mean the power supply is failing or delivering unstable current. This instability can cause intermittent operation and unexpected reboots.
Replacing the power adapter or investigating further into the circuit may resolve the issue without the need for an expensive replacement.
By systematically checking current at different points in a circuit, you can isolate the source of the problem and avoid unnecessary replacements.
Whether you’re troubleshooting electronics, automotive systems, or household gadgets, knowing how to measure current gives you a valuable advantage in diagnosing and resolving electrical issues efficiently.
Expanding Your Multimeter Skills: Beyond Basic Current Measurements
Now that you’ve mastered the fundamentals of measuring current with a multimeter, you can begin exploring additional ways to use your tool for more advanced diagnostics.
In this final section of “Multimeter How to Measure Current,” we’ll introduce a few practical applications that build upon your newfound skills, helping you get the most out of your multimeter.
While current measurement is an essential starting point, your multimeter can also assist with checking power consumption, identifying circuit inefficiencies, and even testing solar panels or charging systems.
One particularly useful application is measuring the power consumption of electronic devices. Power is calculated by multiplying voltage and current (P = V × I), and knowing how much power a device uses helps determine energy efficiency and battery life.
For example, if you’re trying to optimize the runtime of a battery-powered project, you can measure both voltage and current, then multiply them to find the total power draw in watts (W).
This information helps you estimate how long a battery will last under continuous use. If a device is drawing more power than expected, it might indicate a faulty component or inefficient circuit design that could be improved.
Another valuable skill is identifying circuit inefficiencies by comparing expected current values with actual measurements. Many electronic components have specified current ratings listed in their datasheets.
If a component is drawing significantly more current than it should, it might be failing or operating under stress. For instance, if a motor is supposed to draw 500 mA under normal conditions but is pulling 1.2A instead, it could indicate mechanical wear, misalignment, or an electrical fault.
Tracking these deviations helps you catch problems early and prevents further damage to the system or electronic board.
Testing solar panels or charging circuits is another advanced application that builds on your current-measurement knowledge. Solar panels generate current based on available sunlight, and measuring this current helps assess performance.
To test a solar panel, set your multimeter to DC current mode and connect it in series with a small load, such as a resistor or LED. Exposing the panel to sunlight should produce a measurable current.
If the reading is significantly lower than expected, it could indicate a problem with the panel itself or shading that reduces efficiency.
Similarly, measuring the current output of a USB charger or battery pack helps verify whether it meets advertised specifications and delivers sufficient power to charge devices effectively.
By expanding your multimeter usage beyond basic current checks, you gain a more comprehensive toolkit for diagnosing and repairing electrical problems.
Whether you’re calculating power consumption, identifying inefficiencies, or testing renewable energy sources, these additional skills enhance your ability to troubleshoot effectively.
With consistent practice and exploration, your multimeter will become an indispensable companion in both everyday fixes and more complex electronic projects.